What's new

AC86U Heat sink mod.... er hack

  • SNBForums Code of Conduct

    SNBForums is a community for everyone, no matter what their level of experience.

    Please be tolerant and patient of others, especially newcomers. We are all here to share and learn!

    The rules are simple: Be patient, be nice, be helpful or be gone!

@Maverickcdn could i use a copperpipe and cut and flatten a small piece?
No I wouldnt

Hard mount cooling (no thermal pad) requires true flat surfaces. You risk overheating part of the die cause there is poor contact

its $14 canadian rubles for copper stock, a hacksaw and couple dabs of thermal grease/paste (required), (optionally, sandpaper to smooth the copper as much as possible)

Amazon Copper Stock
Amazon Thermal Compound
Crap, i cant get a small piece of Copper. I have thermal compound.but ac86 is HOT
 
I found some for wifi is also 3mm thick?

IT says quality Sf-Cu half-hard. Would IT be ok?

Close to 3mm anyway, wifi also had 2.5mm thermal pads (im pretty sure anyway) but didnt have an impression like the CPU die one.

Honestly thinking about it more for the temps the radio chips run at, copper is overkill, adding thermal compound to the pads may help reduce the temp another few degrees.

As long as its roughly a 15mm x 15mm x 3mm piece of flat copper stock it'll work.
 
Thinking about this even more...

Given Id used a 3mm piece of copper.... I would not put copper on the wifi chips and would retain the pads or at the very least measure and use exact sized copper for all 3.

The screws that mount the heatsink are short, fine thread, and 3 or 4mm screws. The heatsink has 'some' flex but I fear disaster will strike someone if they try and remount their heatsink with 3 pieces of oversized copper and they end up crushing their CPU die (corners of a die are extremely fragile) trying to put in the screws

Remember this is a warranty voiding MOD/HACK and like all physical mods/hacks it comes with its own inherent device killing risks. You've been warned.

Apologies for the titling and wording of this thread, but this thread was not intended to be a guide but more a blog about about my experience modding my unit and it currently lies somewhere in the middle. Im a believer in well written mod guides which would require measuring clearances and providing exact details, things I never got to. If you've never done something like this before read the disclaimer above a few more times, if you're still confident in trying it out there's nothing like the thrill of seeing your handy work full fill the goals you set for it, in this case for me it grossly exceeded my expectations, since the compound has cured and a little cooler here my unit idles at 38C and hit a low of 36.5 with 1 80mm fan. Thread probably should have been titled AC86U Heat Sink Hack :)

My way of thinking
Hack=lacking in details, just the basics, if you do this + this you get this
Mod=descriptive guide, measurements, methods, similar to a 'how to'

So again, perform these alterations at your own risk, the information provided is what worked for ME

Happy routing and modding... er hacking :cool:

Mav

custom script output
tempmon.PNG
 
Last edited:
Thinking about this even more...

Given Id used a 3mm piece of copper.... I would not put copper on the wifi chips and would retain the pads or at the very least measure and use exact sized copper for all 3.

The screws that mount the heatsink are short, fine thread, and 3 or 4mm screws. The heatsink has 'some' flex but I fear disaster will strike someone if they try and remount their heatsink with 3 pieces of oversized copper and they end up crushing their CPU die (corners of a die are extremely fragile) trying to put in the screws

Remember this is a warranty voiding MOD/HACK and like all physical mods/hacks it comes with its own inherent device killing risks. You've been warned.

Apologies for the titling and wording of this thread, but this thread was not intended to be a guide but more a blog about about my experience modding my unit and it currently lies somewhere in the middle. Im a believer in well written mod guides which would require measuring clearances and providing exact details, things I never got to. If you've never done something like this before read the disclaimer above a few more times, if you're still confident in trying it out there's nothing like the thrill of seeing your handy work full fill the goals you set for it, in this case for me it grossly exceeded my expectations, since the compound has cured and a little cooler here my unit idles at 38C and hit a low of 36.5 with 1 80mm fan. Thread probably should have been titled AC86U Heat Sink Hack :)

My way of thinking
Hack=lacking in details, just the basics, if you do this + this you get this
Mod=descriptive guide, measurements, methods, similar to a 'how to'

So again, perform these alterations at your own risk, the information provided is what worked for ME

Happy routing and modding... er hacking :cool:

Mav

custom script outputView attachment 29528
Just keep breathing bro. I Just try to get things clear before i even give IT a shot. So if IT is open and IT should be the same size Copper, then why not do it. Since there is plenty right.

So i even thought to place a notobook heatpipe cpu cooler. I have a few so could also be a option. Fact... Its running damn hot...
 
So today i had a big issue, temps of my unit raised up to 80 to 86 degrees... even on high load 93. The router became unstable. And data transfers where dropping extremely.
So i decided to or buy a new router, or mod this unit... and if fail... buy a new router :)

So what i did is a took a old heatpipe. And cut a piece of copper, the size is 1,7 mm, i checked the dept of the unit and i saw this should be a exact fit in my case (i dont know how @Maverickcdn pushed in 3mm) any how... I added some thermal compound. Currently unit is responsive again add a temprature of 60 / 65 degrees.
 
Nice job Maverickcdn, thanks for sharing.
 
So my RT-AC86U, hardware version R1.5 manufactured 2018 warranty expired June 2020, is maintaining 2.4/5/cpu 57C 61C 93C with room ambient 23C and cpu constantly 95-98% idle on merlin latest 386.2_6.... it needs assistance, and this thread has already been a big help! Thank you!

For clarity though, I'm looking at thermal pastes 12.7 to 15.7 W/mK, thermal pads 12.8 W/mK, and/or copper shims to order, and still haven't decided.

If I get the thermal pad, then it makes sense to get the 2.5mm exact thickness replacement. If I go this route, to confirm, I would also use thermal paste on both sides of the thermal pad?

If I get copper, should I really get 3mm, or should I get something 2mm or 2.5mm? Reference, in a previous reply, Darkje indicated he was observing a distance of 1.7mm. What about getting a pack of copper shims that vary in thickness (0.3mm, 0.5mm, 0.8mm, 1mm, 1.2mm, etc) and then using a combination of them? Of course, however, one piece is obviously superior and the best route. Related, again, I gather that I would put thermal paste on both sides of the copper shim(s)?

Fwiw, I assume OP totally removed the pad and placed the copper with paste on each side in its place? note: at first sight of the second photo, I was wondering or questioning whether the position of the copper in the photo was its final placement (next to the original pad)! :p

cheers!
 
Last edited:
Thinking about this even more...

Given Id used a 3mm piece of copper.... I would not put copper on the wifi chips and would retain the pads or at the very least measure and use exact sized copper for all 3.

The screws that mount the heatsink are short, fine thread, and 3 or 4mm screws. The heatsink has 'some' flex but I fear disaster will strike someone if they try and remount their heatsink with 3 pieces of oversized copper and they end up crushing their CPU die (corners of a die are extremely fragile) trying to put in the screws

Remember this is a warranty voiding MOD/HACK and like all physical mods/hacks it comes with its own inherent device killing risks. You've been warned.

Apologies for the titling and wording of this thread, but this thread was not intended to be a guide but more a blog about about my experience modding my unit and it currently lies somewhere in the middle. Im a believer in well written mod guides which would require measuring clearances and providing exact details, things I never got to. If you've never done something like this before read the disclaimer above a few more times, if you're still confident in trying it out there's nothing like the thrill of seeing your handy work full fill the goals you set for it, in this case for me it grossly exceeded my expectations, since the compound has cured and a little cooler here my unit idles at 38C and hit a low of 36.5 with 1 80mm fan. Thread probably should have been titled AC86U Heat Sink Hack :)

My way of thinking
Hack=lacking in details, just the basics, if you do this + this you get this
Mod=descriptive guide, measurements, methods, similar to a 'how to'

So again, perform these alterations at your own risk, the information provided is what worked for ME

Happy routing and modding... er hacking :cool:

Mav

custom script outputView attachment 29528
What thermal pad thickness should be on the wifi chips without the copper shim?
When i opened my 2020 unit, i had no thermal pads on the Wifi chips..
 
What thermal pad thickness should be on the wifi chips without the copper shim?
When i opened my 2020 unit, i had no thermal pads on the Wifi chips..
Sorry I never actually measured them. They were roughly 2.5mm thick.
 
I completed the mod as well.... bought a pack of copper shims all measuring 15mmx15mmx1.2mm for about $7 on Amzn.

Opened it up, removed the heat sink, removed the pad from the cpu, put 2 of the above shims right on the processor, no thermal paste. Placed 1 shim each on the existing thermal pad on each of the wifi chips. The 15mm square would not fit inside the wifi chip opening to actually be able to make contact with the chip - the opening is smaller than for the cpu - and I didn't have a saw to be able to trim anything down.

Huge drop in cpu temp, moderate drop in radio temps. Went from 56C-60C-87C to 52C-52C-62C
Has it affected the performance of your router besides the drop in temperatures?
 
I completed the mod as well.... bought a pack of copper shims all measuring 15mmx15mmx1.2mm for about $7 on Amzn.

Opened it up, removed the heat sink, removed the pad from the cpu, put 2 of the above shims right on the processor, no thermal paste. Placed 1 shim each on the existing thermal pad on each of the wifi chips. The 15mm square would not fit inside the wifi chip opening to actually be able to make contact with the chip - the opening is smaller than for the cpu - and I didn't have a saw to be able to trim anything down.

Huge drop in cpu temp, moderate drop in radio temps. Went from 56C-60C-87C to 52C-52C-62C
I hope you didn't put the copper shim directly on the cpu die and pad onto the shim, should first be pad and then the copper shim on top.
regards the wifi chips, they are fine without copper, just put a thermal pad on them and it is enough.
 
I completed the mod as well.... bought a pack of copper shims all measuring 15mmx15mmx1.2mm for about $7 on Amzn.

Opened it up, removed the heat sink, removed the pad from the cpu, put 2 of the above shims right on the processor, no thermal paste.

Huge drop in cpu temp, moderate drop in radio temps. Went from 56C-60C-87C to 52C-52C-62C
You really should use thermal compound, especially if you're stacking shims

Amazon 3mm copper
Arctic Silver

I hope you didn't put the copper shim directly on the cpu die and pad onto the shim, should first be pad and then the copper shim on top.
regards the wifi chips, they are fine without copper, just put a thermal pad on them and it is enough.
Sounds like he removed the pad and stacked two shims...

With thermal compound and a fan with minimal air flow you should be closer to this

Code:
ASUSWRT-Merlin RT-AC86U 386.3_0 Fri Jul 23 17:52:57 UTC 2021
Current date/time             : Sat Oct 30 21:06:33 MDT 2021
Boot date/time                : Mon Sep 13 19:06:54 MDT 2021
Router uptime                 : 47 days 01 hrs 59 mins 39 secs
Last successful login         : Oct 30 14:17:35 from 10.1.1.7:51074
Current CPU/5.0 Temperature   : CPU:38.5C 5.0 Radio:51C

MavMAIN|>/jffs/scripts| sh tempmon.sh
        tempmon appears to be already monitoring with PID 2527
        Current: 38.5C Current Avg: 38.2C of 8499 polled temps at 3 second polling
        Logging period: 12h CPUhigh: 39.5C CPUlow: 37.0C
        Alltime: CPUhigh: 45.4C CPUlow: 32.6C Avg of last 94 averages: 38.5C
        Monitor uptime: 47 day(s) 1 hr(s) 59 min(s) 40 sec(s)
MavMAIN|>/jffs/scripts|
 
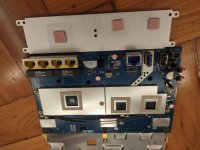
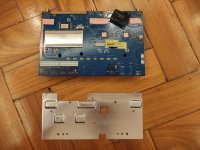
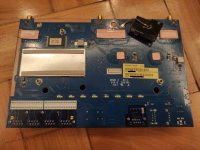
I had the same overheating problem. (28°C ambient temperature).
Without any cable on the 4 x Gigabit LAN ports, CPU was at 94°C.
If I connected 2 ports, temperature would reach 100°C and one CPU Core would turn off (and keep off)...
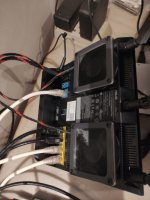
First I used an 8mm USB fan, the temperature on CPU went down to 84°C.
Then I bought some 2,5mm thermal pads (for CPU) and some 3mm thermal pads (for the 2.4 GHz and 5 GHz chips - 3.5mm would fit better, but I could not find it). The pads I bought were wax based, and not silicone based as the original pink ones... (wax based is more complicated not to make a mess...)
Seems like the original pads lost some silicone with time and got dried...
Did not touch the pads on the other side, I guess they are something like 0.5 or 1mm.

With the new pads and no fan:
2.4 GHz - 5 GHz - CPU
49°C - 54°C - 77°C (with 4 x Gigabit LAN ports being used)
47°C - 53°C - 68°C (with no wires on the 4 x Gigabit LAN ports)

With the new pads and one 8mm fan:
42°C - 48°C - 57°C (with 4 x Gigabit LAN ports being used)
41°C - 47°C - 46°C (with no wires on the 4 x Gigabit LAN ports)

Today I installed dual 7mm USB fans, it got even better:
2.4 GHz - 5 GHz - CPU
36°C - 44°C - 44°C (with 4 x Gigabit LAN ports being used)
36°C - 44°C - 40°C (with no wires on the 4 x Gigabit LAN ports)
 

Attachments

  • 1636306939768.jpg
    1636306939768.jpg
    114.5 KB · Views: 371
  • 1636306939777.jpg
    1636306939777.jpg
    145.5 KB · Views: 367
  • 1636307016319.jpg
    1636307016319.jpg
    123 KB · Views: 383
  • WhatsApp Image 2021-11-07 at 15.10.59.jpeg
    WhatsApp Image 2021-11-07 at 15.10.59.jpeg
    66.2 KB · Views: 373
Last edited:
  • Like
Reactions: Ngr

Support SNBForums w/ Amazon

If you'd like to support SNBForums, just use this link and buy anything on Amazon. Thanks!

Sign Up For SNBForums Daily Digest

Get an update of what's new every day delivered to your mailbox. Sign up here!
Top