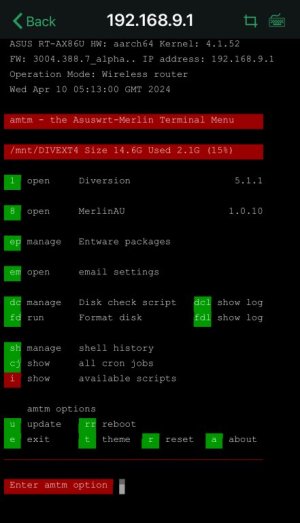
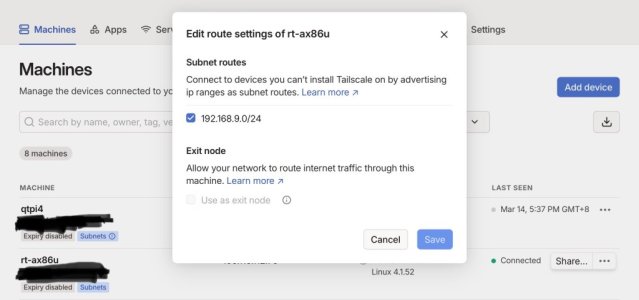
Would it be at all possible for one of you kind souls here to summarise in an idiot-proof, easy, step-by-step way to get Tailscale to be up and running on my GT-AX6000? Reading through the earlier posts on here is like looking at a foreign newspaper to me and I would greatly appreciate some simple guidance.
Hi,
TBH, as there is no automatic script yet (
my plea for a script goes out to the coders doing addon scripts) and (per this thread) every time amtm is updated for entware it breaks this Tailscale install, so you need to be confident you can redo it (until someone says OK I will make a script as a bolt-on for amtm).
So due to this install being “on your router” my tentative advice (to separate the two) would be to get an AppleTV (HD or 4K) or maybe repurpose an RPi or an old ThinClient with DietPi and and install Tailscale on that, set it up as a subnet Router, then plug it into your Network via an Ethernet cable.
Anwyay, I will have a go, although it will essentially paraphrase Randomuser777s excellent input.
Your sig doesn't say what you have installed by way of scripts (if any) so it's a wee bit hard to judge your experience with these and my apologies in advance if you're already well on top of the following basic abilities:
a. Formatting disks (USB or SSD plugged into the Routers Ports) as EXT4 (my preference) or with
b. Accessing the Directories inside the "Guts" of the Router via SSH (a CLI or Command Line Interface, I use Putty) or
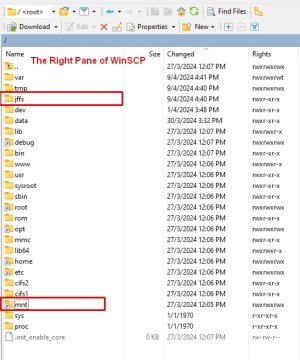
c. Accessing the same Directories using WinSCP (a Windows-based "File Explorer" which you can use to access files on the Router as well as on the USB Drive (via the 'mnt' shortcut you will see when you access your Router via WinSCP; note that you will only see this AFTER you attach and format a drive).
So with this in mind, I will try to aim at the simplest sequence, then expand on each.
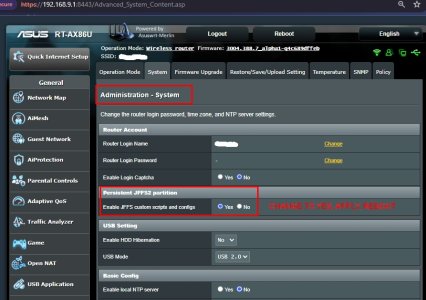
1. Ensure jffs Custom Scripts is ENABLED in your Admin-System menu (see pic below); and
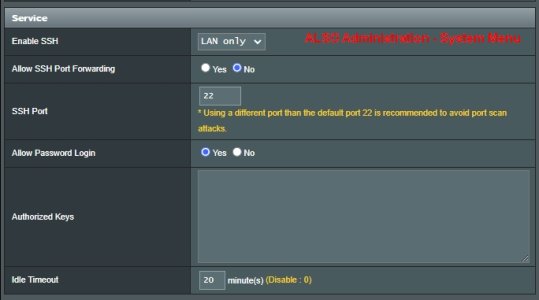
2. Ensure SSH is ENABLED in your Admin-System menu; reboot.
3. Test SSH Access is succesful using Putty and WinSCP; get this right first, you cannot do anything without it. Access your Router's admin IP Address, same as the GUI address, you can run it with the GUI open too. Check in the
mnt shortcut what the
name of your disk is as you will need it in the 'ARGS' line below (note that you will only see this AFTER you attach and format a drive).
4a. Run amtm from CLI (ssh in to your Router using Putty) and just type
amtm.
Starting with Asuswrt-Merlin 384.15, amtm is included in the firmware; then
4b. Install entware from the amtm menu (a
prerequisite).
4c. Then Install the Format Disk Script from within amtm, it’s called "fd" (unless you just want to use the CLI for formatting the disk). See amtm menu pic below for what it looks like when it is installed. Note I have a couple of other scripts showing in that pic (Diversion, MerlinAU), that you do not need for this install.
5. Plug a USB or SSD into one of your Router's USB Ports and format it (I use Ext4 without journaling), using either amtm’s “fd” script (recommended, just follow the amtm prompts) or use the CLI (see ColinTaylors wiki posts linked below). You 'can' also format it first, then just plug it in, but I prefer doing it on the Router. I believe Ext2 is also OK, but I am no expert on this. Do not forget to
name it. At this point, using WinSCP you should be able to navigate to the
mnt shortcut.
6. Download the most up to date stable Tailscale “static binaries, other distros” (from
Tailscales website, use arm64) to your Windows Desktop, extract them to a Folder. Park them for now. You only need to keep the
tailscale and
tailscaled files (two files total).
What follows is primarily from RandomUser777
7. SSH into (using Putty) your Router and issue the three commands (one after the other), without "quotes"
"opkg install ca-bundle"
"opkg install tailscale"
"opkg install tailscaled"
The third one will throw an error, but if you look at
post #18 in this thread I got that error too. Randomuser777 said (in post #19) he got it too and just ignored it. I believe it installs it anyway.
8. Fire up WinSCP (slr to Putty but like a Windows Explorer Version, easy to navigate to dirs).
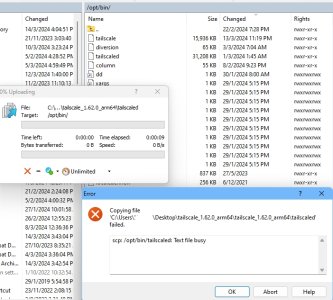
Once into your Router using WinSCP (normally the right pane), navigate back up the directory tree to the very root dir, then go back down and navigate to /opt/bin/. Copy the
two Tailscale files you previously saved onto your Windows Desktop DIR and overwrite the ones already in in /opt/bin/.
Make sure they have the
same permissions as the originals (executable, etc).
I cannot recall if I had to change the permissions and if so how I did so but if you get stuck I can have a look how to do this.
9. Using WinSCP, navigate to and edit the file S06tailscaled in /opt/etc/init.d/ to point to the correct files (make sure your /mnt paths exist/are correct for your setup).
-------
#!/bin/sh
ENABLED=yes
PROCS=tailscaled
ARGS="-tun=userspace-networking -statedir /mnt/
YOURDRVNAME/tailscale/"
PREARGS=""
DESC=$PROCS
PATH=/opt/sbin:/opt/bin:/opt/usr/bin:/usr/local/sbin:/usr/local/bin:/usr/sbin:/usr/bin:/sbin:/bin
. /opt/etc/init.d/rc.func
-------
IIRC you ONLY need to change the ARGS line but please check (see my comments above, on RandomUsers777 original comments). For reference only, see my comments here in
post#18.
10. ***Reboot ROUTER****
SSH to CLI using Putty
run "tailscale update"
run "tailscale login"
Note my feedback to Randomuser777 in
post#18 (my feedback item 11j; you should see the same.
Running "tailscale update" from the CLI, it said it was already the latest (which I expected as I downloaded the latest in an above step)
running "tailscale login" gave me a specific URL (which I copied to a Browser, Chrome) which allowed me to add the Device to my existing Tailnet. All good.
Existing TailNet in this instance, assumes you already have an Tailscale account set up.
11. Insert the following code into the firewall-start file (make sure your subnet is correct, you probably just need to change the "
50" to something else, if anything).
The firewall-start file (there is no .txt or anything, just open it in WinSCP by double clicking) is in the jffs/scripts directory:
-------
tailscale up --accept-routes --advertise-routes=192.168.50.0/24
-------
***Reboot ROUTER****
12. Put these entries in the services-start script (also in jffs/scripts):
-------
/opt/etc/init.d/S06tailscaled start
tailscale up --accept-routes --advertise-routes=192.168.50.0/24
-------
Substitute the
.50. Part with your own subnet.
That's it. If you get stuck, drop us a line and I will try and guide you through it.
For formatting the USB Drive on the Router see ColinTaylors Wiki
reference but amtm’s fd script is pretty self-explanatory.
For Putty Usage, all you need is an IP Address and a Port.
You can save the login/pwd if you wish, for faster access.
For WinSCP I use SCP Protocol Port 22.
) support this install of Tailscale, but as amtm (appears to update it, albeit not the latest stable version), I thought I would ask if there is a way to exclude the tailscale update from the Entware packages update please and also stop it from modifying /opt/etc/init.d/S06tailscaled?


